Commercial Method
John McCabe
The following describes a very common commercial method of opening
oysters. Most of the oyster meats we buy at the seafood market
in pint or gallon containers were pulled from their shells (shucked)
in this way - one by one. This commercial method works with every
culinary oyster type. Depending on oyster size, professionals
can shuck anywhere from ten to twenty gallons of oyster meat
per day. Even the tiny Olympia oyster is shucked in this way.
It takes about 250 of them to fill just one pint. Although mankind
has proven to be able to fly to the moon and build weapons that
can easily destroy our entire world, no machine has ever been
designed that can replace commercial oyster shuckers.
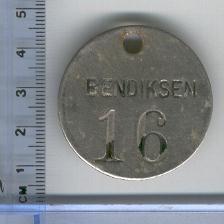 Inset image: Oyster shucker opening marker (or
"token") from the 1950s. Markers of this type, either
in steel or brass were once commonly used on both the American
West and East Coast. They are highly collectible. Measurement
on this marker is in centimeters. The number denoted the respective
shucker. The marker was added to each gallon of oyster meat processed.
This one originates from the Bendiksen oyster plant which operated
on Willapa Bay at the town of Nahcotta, Washington. Old man Bendiksen
is now an important historical figure in those parts. Many of
the oldtimers out there still remember him well as one tough
oysterman. He worked hard in his plant clear up until his death
(died in his eighties).
Advantages:
* Essentially an easy opening method. What makes it difficult
is maintaining the speed it requires to produce a large volume
of oyster meat in the course of a work day and the consistent
accuracy necessary to precisely sever a part of the bill of the
oyster shell for hours on end without stabbing one's hand instead.
* Large quantities of meat from any type of oyster can be gleaned
with great efficiency (presupposing experienced shuckers).
Disadvantages
* Oysters opened in this manner are not suitable for half shell
trade. The shells are rendered highly unattractive. They are
initially discarded right after opening, then gathered and piled
high outside the shucking facility, gradually become naturally
weather bleached over time, and are later reused in the oyster
cultivation process as so called cultch (for little oyster
babies).
* Shell splinters are unavoidable. The oyster meats need to be
thoroughly washed after shucking.
* The processing monotony and constant banging noise of pounding
blades starts to weigh on the soul after many hours of shucking.
There are always more oysters pushing down in the stainless steel
chute waiting to be processed - with seemingly no end in sight.
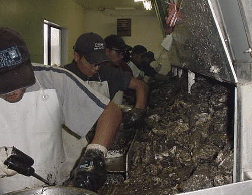 Image: Professional oyster shuckers hard at work.
The work rooms are climate controlled and kept cool. The shuckers
constantly receive a seemingly endless supply of fresh oysters
from a line of gravity fed stainless steel chutes.
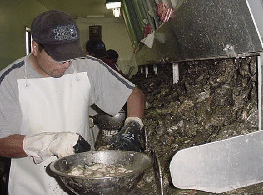 Image:The
oysters are opened at an astoundingly rapid pace. After each
oyster is opened, its meat ends up in a large stainless steel
bowl. All the meats are then thoroughly washed and sorted for
size in other work areas.
The following pictures are simply a few
I took at home to demonstrate how the method essentially works.
Just imagine sturdy rubber gloves, thousands of oysters coming
at you from huge chutes, a dozen guys and gals working next to
you, the sound of many blade tips constantly pounding into hard
oyster fortresses, and countless oyster meats being scraped into
big stainless steel bowls.
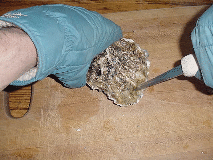 Right about there looks good to chop off a piece of
this large Pacific oyster's bill.
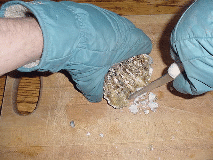 My kitchen table is not sturdy enough and my aim with
the oyster knife tip is not good enough, so I'm taking it nice
and slow.
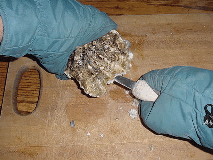 In goes
the blade to cut the adductor muscle located inside and to the
left.
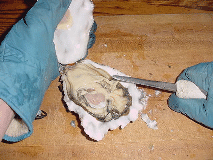 Off comes the shell. After cutting the base of the
adductor musscle as well, the big chunk of oyster meat is ready
to be moved into a bowl.
Culling
There are a number of important
tasks that precede the commercial oyster opening process. They
vary due to the different ways oysters are cultivated and what
oysters end up looking like at the time of harvest. Following
the primordial call to start forming reefs, oysters that are
left to their own devices for three to four years in regions
where they naturally reproduce will frequently grow into clusters.
Subsequently, an oysterman will end up with a bunch of big chunks,
each one of which will contain many oysters of varying shape
and size - glued together and bizarrely entwined in a way only
oysters understand. To make sense of such an oyster chunk in
the commercial sense of gleaning as many marketable oysters as
possible with the least amount of waste of product and time takes
experience - and plenty of it. This is called culling.
Professional culling it is every bit as important as professional
shucking - and requires the same or more skill.
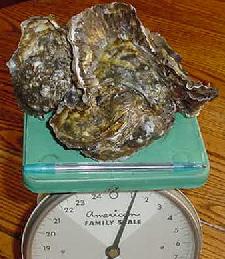 Image
left: A typical oyster clump - in this case Pacific oysters.
It weighs just a tad over one pound. A clump of oysters is not
so unlike a big gemstone in the rough. With well contemplated
cuts, a skilled gemstone cutter will turn any crude gemstone
rock into several precious jewels. Conversely, an unskilled cutter
will quickly ruin nature's bounty permanently. Essentially, the
only difference between a good gem stone cutter and a good oyster
culler is time. An oysterman has to skillfully process many of
these oyster clumps very quickly. Some have been known to process
hundreds of these clusters in a day.
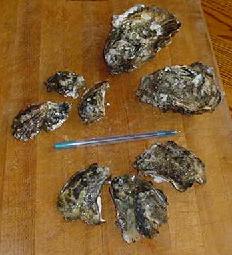 Culling has reduced the clump pictured above into
eight oysters (two large three year olds, three two year olds,
and three yearlings).
Culling Hammers
A culling hammer is not used to open oysters. Instead, it is
a precision tool used to eliminate empty attached shells and
separating marketable oysters from oyster clusters. This process,
called culling, is performed at a fast pace - ideally
without damaging the marketable oysters desired. Equally, a professional
culler will keep the destruction of the small "seed oysters"
("oyster babies" that are usually also attached to
the "oyster clump") to a minimum. These little ones
can be left behind on, or be returned to the harvested area to
continue to grow to marketable size. Also, a culler may have
to observe some minimum legal harvesting size that may be in
effect in some regions. Culling hammers have a long history,
most notably in the context of Eastern oysters (Crassostrea
virginica) and to some extent Pacific oysters (Crassostrea
gigas).
Historically, these culling hammers (and all other types of culling
tools) have turned up in many shapes and sizes. They often started
out as varied hammer types such as roofing hammers, small mining
hand picks, ball peen hammers, riveting hammers, setting-down
hammers, etc., or other suitable tool types. These were then
customized to optimize their function as oyster culling tools.
Culling hammers are usually fairly light weight with a good hand
feel so that they can be used for hours on end. Frequently they
look crudely made. Usually they are tailored to work best with
the most prevalent types of oyster clumps encountered in a particular
oyster harvesting area. Hence, there never existed an "official"
design for a culling hammer.
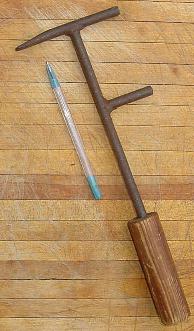 Case Study:
Culling Hammer from the Chesapeake Bay
The pictured hammer is a classic Eastern U.S. culling hammer
design (click image to enlarge).
| Weight |
275 g (10 oz) |
| Length |
314 mm (12 3/8") |
| Head |
108 mm (~ 4 1/4") |
| Head Diameter |
9 mm (3/8") |
| Wood Handle Length |
110 mm ( ~ 4 3/8") |
| Handle Diameter |
30 mm (~ 1 1/8") Wood round stock |
Once commonplace on the Chesapeake Bay,
these hammers have since become rather scarce collector items
due to the dramatic decline of Eastern oyster stocks since the
1950s (due to over-harvesting, oyster diseases Dermo and MSX,
and pollution). I bought this particular hammer from an acquaintance
of a blacksmith by the name of Jack Swift, who operated one of
the last (perhaps the last) blacksmith operations "on the
shore" geared almost exclusively to the shellfish business
(knives, rakes, tongs, hammers, dredges, etc.). The shop was
located in the famed little town of Crisfield, Maryland.
This hammer likely dates back to some time around the mid 20th
century. It is made of carbon steel and features a round wood
handle. The inside diameter of the shell gauge (two steel bars
over/under) measures exactly 3 inches (or 76 mm; min. harvest
size). One end of the head's 3/8" round stock steel was
worked downward starting at 1.5" (or 38 mm) from its end
with a gentle slope of about 8° (detail
pic. here). At about the half inch point (approx. 15 mm)
down the slope, this head-end gradually begins to flare, culminating
in a width of 5/8" (approx. 16 mm) at its flat tip (detail pic.
here). From the same point as on the upper side (1.5"
from the end), the round underside was ground flat (no slope).
The duck-bill shaped end is slightly convex. The wood type of
the round-stock handle is not known to this writer. Aside from
some light and even surface rust, the functional condition of
this very robust hammer is "good as new".
Case Study: Oyster "Cluster
Buster" from the Willapa Bay
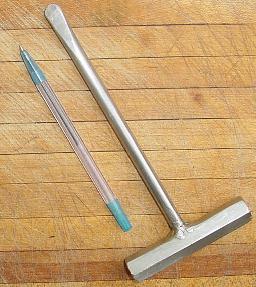 The
pictured culling tool (click to enlarge) was custom made by Larry
Warnberg, a remarkable (and now retired) oysterman from Nahcotta,
Washington (Nahcotta Oyster Farms). Much like the new
owner of Larry's operation still does, Larry specialized in organically
grown Pacific oysters (i.e. no pesticides like Carbaryl
permitted on his oysterbeds etc.). He utilized a variant of so
called pole cultivation. For more than twenty years he would
harvest countless three to four year old oyster clusters that
formed on a pattern of thousands of three foot PVC pipes he had
driven into the tide-flats about a foot deep. I stopped in many
times over the years for two reasons: 1. To buy a bunch of his
delicious oysters which he was selling at the best price per
dozen I could find anywhere; and 2. Larry always made time to
answer a bunch of my detail questions about the oyster industry
on the Willapa Bay. Usually, while talking with me, he went right
on "busting oyster clusters" with the pictured tool
with amazing speed, accuracy, and very few damaged oysters -
all the while sorting small, medium and large sizes. Windy, rainy,
ice cold weather did not seem to change his fast pace or consistently
good attitude a bit. One day, I asked if I could buy one of his
"cluster busters" for closer analysis (I simply made
up the informal name for this tool as it does not have any formal
name besides "culling tool"). He proceeded to just
give me one of them. Some specs on "Larry's Cluster Buster":
| Weight |
285 g (~ 10.5 oz) |
| Tool Length |
192 mm (~ 7 1/2") |
| Handle Length |
90 mm (~ 3 1/2") |
| Handle Diameter |
17 mm (~ 5/8"; as measured from flat
to flat of hexagon) |
| Prying Shaft Length |
175 mm (~ 6 3/4") |
| Prying Shaft Diameter |
10 mm (~ 3/8") |
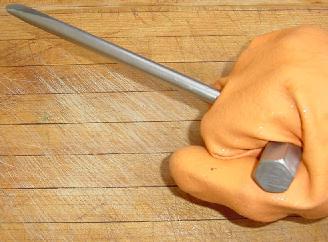 The tool is made entirely of austenitic stainless
steel. The handle is made of hexagonal bar stock which rests
firmly in the palm of the hand. The prying shaft is welded perpendicular
to the handle at its center. The tool subsequently locks in a
fist grip on either side of the middle finger. Wrist action can
pilot the tip of this culling tool at an infinite amount of angles
and bring considerable force to bear if needed. The round stock
3/8" stainless of the prying shaft was ground equally at
top and bottom starting at 1.5" (or 38 mm) from its end
with a gentle slope on the top and bottom side of about 4°,
culminating in a flat and rounded tip.This culling tool seems
indestructible.
Cluster Shucking
Instead of culling an oyster clump first, some skilled shuckers
can efficiently process entire clumps for meat. This is not uncommon
in so called "longline cultivation" where oyster clumps
ready for harvest are cut from a long line (typically a three
strand polypropylene line strung out intertidally atop many posts
for about 100 to 200 meters).
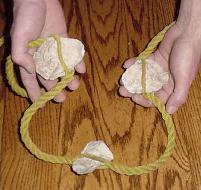 There
are different types of longline cultivation. A typical longline
is manually populated with many oyster shell halves (called cultch)
at intervals (commonly about 20 cm apart). Shells "woven"
into these lines in the pictured manner stay locked in surprisingly
well upon completion. Shell halves with lots of oyster babies
(called spat) can be purchased from commercial shellfish
hatcheries (the finished product being called spatted cultch).
Equally, many longliners spat their own cultch by buying
"eyed oyster larvae" from hatcheries and then "spatting"
their own empty shells in temperature controlled water tanks.
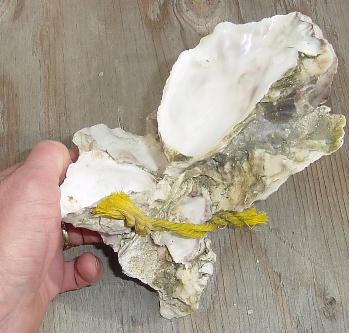 Inset image (click to enlarge): Here we see a processed
longline cluster of Pacific oysters aged about three or four
years old. The cluster was cut from the line and perfectly shucked.
The entire clump originally started with a single spatted shell.
My count of shucked oysters in this particular clump was ten.
Dragging
Dragging describes a method of breaking up oyster clusters with
a harrowing tool which is towed over oyster-beds by a boat. The
method is used in bottom cultivation. The tool is called a drag
and functions much like a spring-tooth harrow in conventional
agriculture. Dragging is typically performed during the second
or third year of growth, right about the time the clusters have
grown quite large and have become increasingly silted in. The
drag lifts oysters up out of the mud and breaks their clusters
into smaller clumps. The oysters then fall back to 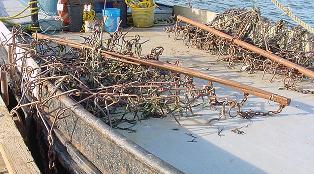 firmer ground for fattening
up until harvest time (which usually occurs a year or two later).
Dragging is quite common on Willapa Bay in the State of Washington.
Several large bottom cultivators there utilize their oyster dredging
vessels for dragging by temporarily substituting the dredge baskets
with drag tools which they hang on the outrigger cables instead.
Much like dredging, dragging requires considerable skill on the
part of the boat operator, particularly since the (expensive)
drag tool is a large, unwieldy and heavy piece of equipment.
Drags are usually made of carbon steel. They require considerable
maintenance. Corrosion (rust), bind-ups and abrasion are constant
marine companions during use, transport and storage (click
image to enlarge).


