Oysters.us - Spat Perceptions Introduction

On Opening Oysters
John McCabe

For those among us who have never opened an oyster before and are considering giving it a try, let's start with a confidence builder:

At the 2006 World Oyster Opening Championship in Galway, Ireland, an Irishman by the name of Michael Moran beat contestants from 17 other countries by opening 30 oysters in two minutes 35 seconds. It was the first win for Ireland in 10 years. However, Michael could not get close to the spectacular record his own father had set in the 1970s: One minute and 31 seconds.

Now that the confidence is up, let's put a little damper on it: France produces anywhere from 130,000 to 145,000 metric tons of Pacific oysters annually. The French consume more than 90% of those oysters themselves - raw, on the half shell. Each year during the Christmas season, approximately 2,000 French oyster lovers seek medical help for injuries sustained while opening oysters.

During the first attempt to open a fair sized oyster, a novice quickly learns that oysters live in truly remarkable shell fortresses. Without the right tools and some how-to pointers he or she is likely to get frustrated rather quickly, or worse, may end up bleeding all over the place - with the oyster probably still residing in its shell, perhaps "happy as a clam". In order to avoid such an unpleasant experience, an oyster novice should first consider the following:

1: Never use a kitchen knife to open oysters! It is foolish and dangerous! Oysters have a way of sometimes opening unexpectedly. The sharp knife blade could easily glide through between the oyster shell halves - right into your hand! The knife can also slip over or under the shell housing - right into your hand or forearm. Incidentally, the blade of any kitchen knife can easily be ruined by the hard shell of an oyster. Before you buy oysters in the shell, consider investing in an oyster knife. Although it can obviously injure you too, at least it is designed to do a much better job helping you open oysters.

2: Protect your hands! Wear gloves! Although oyster knives frequently feature dull edges, their invariably strong points can lead to injuries. Oysters themselves often feature razor sharp edges. On occasion, folks handling oysters with their bare hands notice that they are bleeding before they even notice they've been cut. Even a cheap pair of work gloves, latex palm coated with a breathable knit back, is better than no gloves and will usually cost less than five bucks. Cut resistant gloves are much better (and more expensive). The design of the best oyster gloves is reminiscent of an elegant looking medieval chain mail and offers excellent hand protection (a good pair can cost around $100 or more). If you're going to "cheat" a little, do yourself a favor and at least wear a glove on the hand that is holding down the oyster on the work surface. As a last resort, at least hold the oyster down firmly on the work surface with a towel.

3: Be patient. Take your time! Many frustrated novices start applying excessive force with their oyster knives and then end up hurting themselves. Instead, take five, calm down, and just imagine how tasty the oysters will be. Perhaps you might consider choosing another oyster in your batch and practicing with it instead. Note: Big oysters are the wrong size for a novice. They can be tough - even for a pro. Choose small or medium oysters instead.

4. When in doubt, throw it out! Any opened oyster that emits an odd or bad smell should be discarded immediately. The aroma of fresh oyster meat should always be pleasantly fresh, reminiscent of the ocean shore and the open sea.

* Oyster Basics
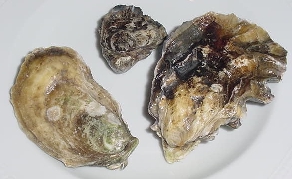
There are two kinds of culinary oysters: "Ovalish" looking ones and "roundish" looking ones. The "ovalish" ones are the most common (and affordable). Naturalists have ordered them under the genus Crassostrea. The big names in the western world are the Eastern oyster (Crassostrea virginica; the one on the left in the picture below), the Pacific oyster (Crassostrea gigas; the one on the right) and to a far lesser extent, the Kumamoto oyster (Crassostrea sikamea; the little fellow in the middle of the picture below).

The "roundish" ones are far less common (and more expensive) than the "ovalish" ones. Naturalists have ordered this kind under the genus Ostrea. The big name in the western world is the European oyster (Ostrea edulis; pictured below). The very distant second place is held by the tiny Olympia oyster (Ostrea lurida a.k.a. Ostrea conchaphila).
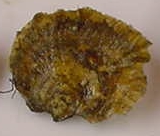
Frequently, based on respective growing environments and cultivation methods, sometimes also in part due to peculiar "whims" of the oysters, the oval ones may grow more "roundish" and the round ones may grow more "ovalish". Since I've now managed to sufficiently confuse the reader, let's move on to some more basics.

* Oyster Layout
For an oyster opener, there are merely five terms to know about an oyster: Beak, hinge, bill, adductor, cupped. The beak is the pointed part of any oyster. Right behind it, the hinge is found. The adductor is a powerful muscle that holds the oyster shut. The bill is the broad flat end opposite the beak. The cupped portion is the "more bellied" shell half of the two oyster shell halves (called valves). That cupped shell is always facing down when opening any oyster. Since all that was way too easy to understand, let's review some of the components in more detail:

* The Hinge

Inset image: The tip of my oyster knife points at the location of the hinge just behind the beak.


The hinge area is one of the vulnerable spots on any oyster, particularly if the classic method of opening is used. The hinges of large and extra large Pacific and Eastern oysters can be extremely tough. A hard twist of the knife handle may even snap the oyster knife blade before breaking the hinge. The clever, commercial, or clumsy method is recommended for large oysters.

* Sizing up the Oyster
Every oyster obviously has two shells (or valves; hence the name bivalve). One shell half will always be more cupped (more convex or more "belly like") than the other. For opening purposes, always consider this cupped shell half "the bottom portion of the oyster". This is the part that will be resting firmly on the work surface during opening. The cupped side is very obvious with the common Pacific and Eastern oyster. The other half of the shell, the "top" is rather flat, almost like a lid. However, both shell halves can at times appear rather flat on the rather uncommon European and Olympia oysters. At times, I've had to look twice to figure out where the "top and bottom" was located.

* The powerful Adductor Muscle
Unlike many other bivalves, the oyster ended up with only one instead of two adductor muscles to keep its shell fortress shut.

Inset image: The adductor muscle is circled in blue and the hinge in orange.

This single muscle is huge and extremely powerful (and very tasty). Opening any oyster with one's bare hands is impossible. Although many creatures employ different ways to get at the tasty oyster inside its shell, the only one that I'm aware of that can conquer the strength of this mighty muscle naturally is the crafty starfish. Patiently he progressively pries apart the shell halves, slowly wears out the oyster's muscle until it must concede a small opening between its shell halves, just enough for the starfish to shove his growling stomach inside and kill it.

The single muscle design of an oyster is certainly an advantage for us oyster lovers. Once we know where it is and are able to cut it, the oyster's shell fortress has fallen. In this picture I used a Pacific oyster to demonstrate estimating the approximate location. Its location is the same on an Eastern oyster. With the oyster "belly down" and its "beak" pointing towards the opener, the oyster can be divided into two halves with an imaginary line running from the beak to the front (bill) of the oyster. The adductor is located slightly beyond the midpoint of the line and to its right. Many oyster lovers will carefully chip away the shell edge near this point to produce a little opening - just enough to drive little more than the tip of the knife inside the oyster to cut that muscle. Done properly, this method will quickly open any oyster, no matter what species or how big it is. I've named this approach the "clever method", as it uses the calculation of the approximate location of the oyster's adductor muscle to its advantage and bypasses the tough hinge.

A few more Basics:

* Washing the Oysters
Before opening any oysters, it is necessary to thoroughly wash them first. A cheap nylon scrubbing brush is perfect for the job. Washing should be done in the sink under running tap-water (perhaps with the oysters in a convenient colander as pictured). Special cleaning attention should be directed towards the pointed portion of the oyster. This is where the hinge of the oyster is located. Pacific and Eastern oysters in particular have a way of trapping a little mud or other impurities in that area.

* Food Safety
Any cutting board (particularly a wooden one) used in the process of opening oysters should be thoroughly washed and sanitized after the job. The U.S. Dept. of Health and Human Services (via NDDIC) speaks of 1 teaspoon of bleach to 1 quart of hot water when sanitizing surfaces before and after use. I use a higher bleach/water ratio on cutting boards. Gloves are recommended when working with bleach.

After opening each oyster, its meat should be sniffed briefly to make sure it does not smell odd or bad. Although an odd or bad smell is rare, it can happen. The ones that do should be disposed of immediately. When in doubt, throw it out!

Oysters, regardless of whether they are still in the shell or have already been opened, should never be permitted to sit around at room temperature for any length of time. Place them in the refrigerator right after you're done working with them - even if you plan to cook or consume them raw within the next hour.

Wash and hang dry your work gloves after your done opening your oysters. Neoprene and other coated gloves may be towel dried (not heat dried). Particularly wet fabric and leather gloves left laying around are ideal breeding grounds for bacteria.

* Planing Ahead
After opening the oysters, they need to be deposited somewhere. If the oyster meat is desired for cooking, the meats can be scraped right into a bowl full of plain tap water to eliminate any small shell fragments. I prefer to scrape the meats onto a strainer placed on top of a bowl first, so the oyster "juice" (called nectar or liqueur) can drain off into the bowl while I'm opening more oysters. Then I wash the oyster meats in another bowl. When I'm done, I pick the meats out of the washing bowl full of water with my fingers and place them right into the "juice bowl". If I'm not going to use the oysters right away, I'll cover the bowl with plastic wrap and place it in the refrigerator.

Inset pictures: In the picture above you can see my simple set-up: Two stainless steel bowls and three zip-lock bags. The larger stainless steel bowl is covered with a steel mesh strainer (or common grease splatter guard). Piled on top of the strainer are about three dozen extra small Pacific oyster meats I've just removed from their shells. Next to the big bowl is a smaller bowl with cold tap water. Since I intend to freeze these oyster meats, the zip-lock bags are already duly marked with the name of the oyster type, date, size, and the quantity. The oyster meats and the precious oyster nectar trapped in the large bowl (pictured) is then distributed equally among the three baggies. Whatever miniscule shell splinters that may have slipped through the fine mesh of the strainer into the nectar have long settled on the bottom of my "nectar bowl". A slow pour will insure that they stay there. The bags are zipped shut and head right to my freezer. I never freeze oysters longer than three months.

If the opened oysters are destined to be slurped raw off the half shell, a large plate or tray needs to be ready where they can be deposited once opened. Most oysters on the half shell tend to tip over when placed on a plain surface and all their "juice" ends up running out of the shell half. It is best to have an adequate layer of crushed ice on a plate or tray ready where they will stay level more or less. A few notes: Ever since I got tired of smashing ice cubes with a hammer out in the garage, I simply use a thick layer of rock salt on the plate (about an inch or so deep). Rock salt is cheap and comes in a 4 lb box found in just about any large grocery store. Although a few of the salty rocks have a way of adhering a little to the moist outer oyster shell, they wipe right off. Once there are about a dozen oysters on that plate, it is covered with platic wrap and heads right into the refrigerator. Incidentally, clean aquarium pebbles from the pet store also work well. If you don't have crushed ice, rock salt, or clean pebbles, stabilize the oysters with some bunched up aluminum foil around each oyster.

Oysters on the half shell should be served to your guests chilled and as soon as possible, most certainly within just a few hours. The sooner, the better! Never should they be served on the half shell after they've lounged in the refrigerator overnight.

* Lastly: Good Lighting
The work area should be well lit. Besides the fact that common sense dictates this while working with any kind of knife on any kind of food, good lighting will help spot and eliminate small shell splinters and any potential mud residue or other impurities.

Use your own discretion on this one: Occasionally you may spot a little bit of mud present around the edge inside after opening the oyster. I personally consider this no big deal. I simply dab it out gently with the tip of my finger under running water. Losing a bit of plain sea water from inside the oyster shell in the process is irrelevant when compared to unsightly mud residue. What's important is that the bottom portion of the adductor muscle is cut after this process, so the outflow of the natural nectar of the oyster (its blood) is optimized. For the same reason, it is a good idea to allow any oyster opened for raw consumption from its half shell sit for just a short while after opening. This allows its juices to flow a bit and optimizes the taste of the exquisite liquid sipped or slurped right along with the oyster meat. Some purists actually dump the sea water right after opening the oyster and wait for the pure nectar to collect a bit in the shell. They prefer their nectar as "straight" as possible - not diluted by some unremarkable water our oceans are full of.

Fun question: Where is the adductor muscle located inside this absurdly formed 11" long oyster?

Click here for the answer. Btw: I guessed wrong.

Top of Page


Health advisory: There is a risk associated with consuming raw oysters or any raw animal protein. If you have chronic illness of the liver, stomach, or blood or have immune disorders, you are at greatest risk of illness from raw oysters and should eat oysters fully cooked. If you are unsure of your risk, you should consult your physician.


This site is maintained as an archive. Contact:
John W. McCabe Site Archive -
© Oysters / McCabe.us